LaTeX 排版(3):排版

本 系列 介绍了 LaTeX 中的基本格式。第 1 部分 介绍了列表。第 2 部分 阐述了表格。在第 3 部分中,你将了解 LaTeX 的另一个重要特性:细腻灵活的文档排版。本文介绍如何自定义页面布局、目录、标题部分和页面样式。
页面维度
当你第一次编写 LaTeX 文档时,你可能已经注意到默认边距比你想象的要大一些。页边距与指定的纸张类型有关,例如 A4、letter 和 documentclass(article、book、report) 等等。要修改页边距,有几个选项,最简单的选项之一是使用 fullpage 包。
该软件包设置页面的主体,可以使主体几乎占满整个页面。
—— FULLPAGE PACKAGE DOCUMENTATION
另一个选择是使用 geometry 包。在探索 geometry 包如何操纵页边距之前,请首先查看如下所示的页面尺寸。
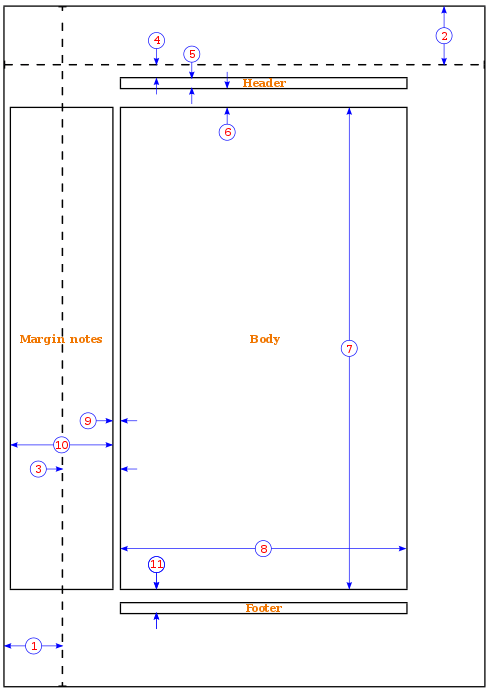
- 1 英寸 +
\hoffset - 1 英寸 +
\voffset -
\oddsidemargin= 31pt -
\topmargin= 20pt -
\headheight= 12pt -
\headsep= 25pt -
\textheight= 592pt -
\textwidth= 390pt -
\marginparsep= 35pt -
\marginparwidth= 35pt -
\footskip= 30pt
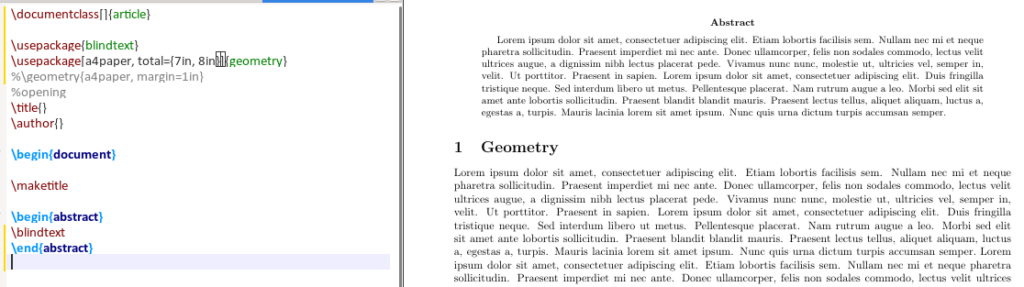
要使用 geometry 包将边距设置为 1 英寸,请使用以下示例
\usepackage{geometry}
\geometry{a4paper, margin=1in}
除上述示例外,geometry 命令还可以修改纸张尺寸和方向。要更改纸张尺寸,请使用以下示例:
\usepackage[a4paper, total={7in, 8in}]{geometry}
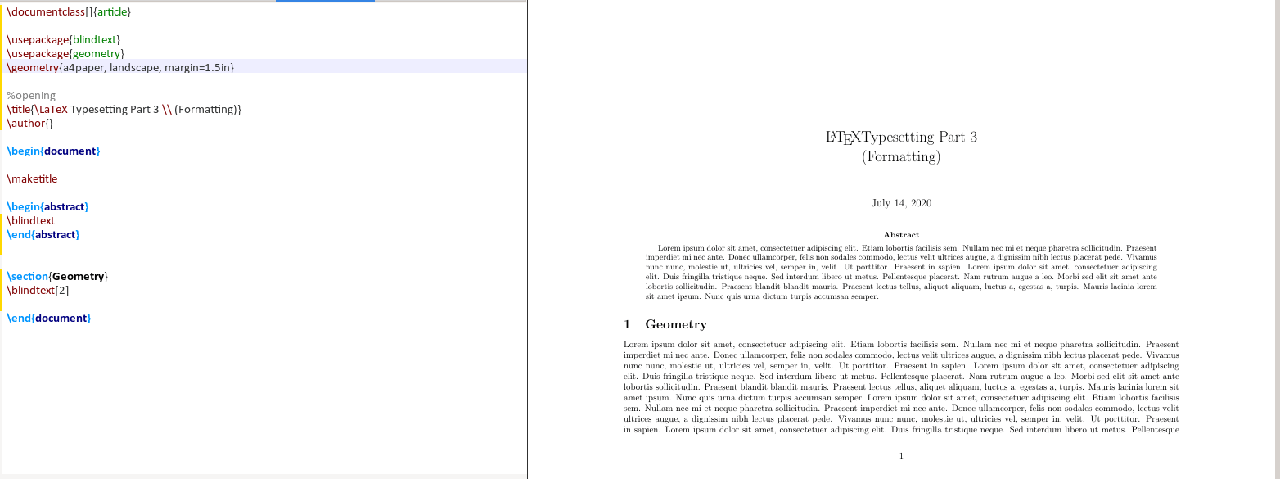
要更改页面方向,需要将横向(landscape)添加到 geometery 选项中,如下所示:
\usepackage{geometery}
\geometry{a4paper, landscape, margin=1.5in
目录
默认情况下,目录的标题为 “contents”。有时,你想将标题更改为 “Table of Content”,更改目录和章节第一节之间的垂直间距,或者只更改文本的颜色。
若要更改文本,请在导言区中添加以下行,用所需语言替换英语(english):
\usepackage[english]{babel}
\addto\captionsenglish{
\renewcommand{\contentsname}
{\bfseries{Table of Contents}}}
要操纵目录与图、小节和章节列表之间的虚拟间距,请使用 tocloft 软件包。本文中使用的两个选项是 cftbeforesecskip 和 cftaftertoctitleskip。
tocloft 包提供了控制目录、图表列表和表格列表的排版方法。
—— TOCLOFT PACKAGE DOUCMENTATION
\usepackage{tocloft}
\setlength\ctfbeforesecskip{2pt}
\setlength\cftaftertoctitleskip{30pt}
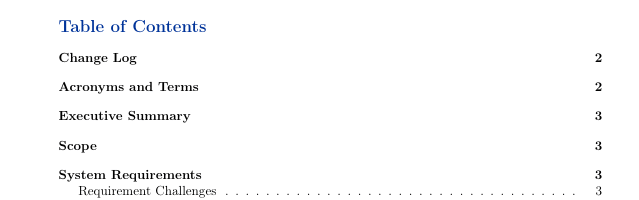
默认目录
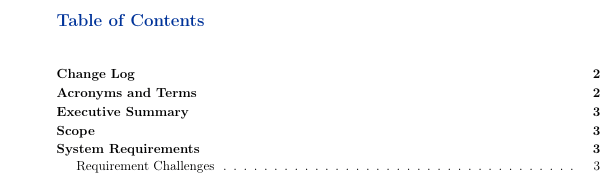
定制目录
边框
在文档中使用包 hyperref 时,目录中的 LaTeX 章节列表和包含 \url 的引用都有边框,如下图所示。

要删除这些边框,请在导言区中包括以下内容,你将看到目录中没有任何边框。
\usepackage{hyperref}
\hypersetup{ pdfborder = {0 0 0}}
要修改标题部分的字体、样式或颜色,请使用程序包 titlesec。在本例中,你将更改节、子节和三级子节的字体大小、字体样式和字体颜色。首先,在导言区中增加以下内容。
\usepackage{titlesec}
\titleformat*{\section}{\Huge\bfseries\color{darkblue}}
\titleformat*{\subsection}{\huge\bfseries\color{darkblue}}
\titleformat*{\subsubsection}{\Large\bfseries\color{darkblue}}
仔细看看代码,\titleformat*{\section} 指定要使用的节的深度。上面的示例最多使用第三个深度。{\Huge\bfseries\color{darkblue}} 部分指定字体大小、字体样式和字体颜色。
页面样式
要自定义的页眉和页脚,请使用 fancyhdr。此示例使用此包修改页面样式、页眉和页脚。下面的代码简要描述了每个选项的作用。
\pagestyle{fancy} %for header to be on each page
\fancyhead[L]{} %keep left header blank
\fancyhead[C]{} %keep centre header blank
\fancyhead[R]{\leftmark} %add the section/chapter to the header right
\fancyfoot[L]{Static Content} %add static test to the left footer
\fancyfoot[C]{} %keep centre footer blank
\fancyfoot[R]{\thepage} %add the page number to the right footer
\setlength\voffset{-0.25in} %space between page border and header (1in + space)
\setlength\headheight{12pt} %height of the actual header.
\setlength\headsep{25pt} %separation between header and text.
\renewcommand{\headrulewidth}{2pt} % add header horizontal line
\renewcommand{\footrulewidth}{1pt} % add footer horizontal line
结果如下所示:

页眉

页脚
小贴士
集中导言区
如果要编写许多 TeX 文档,可以根据文档类别创建一个包含所有导言区的 .tex 文件并引用此文件。例如,我使用结构 .tex 如下所示。
$ cat article_structure.tex
\usepackage[english]{babel}
\addto\captionsenglish{
\renewcommand{\contentsname}
{\bfseries{\color{darkblue}Table of Contents}}
} % Relable the contents
%\usepackage[margin=0.5in]{geometry} % specifies the margin of the document
\usepackage[utf8]{inputenc}
\usepackage[T1]{fontenc}
\usepackage{graphicx} % allows you to add graphics to the document
\usepackage{hyperref} % permits redirection of URL from a PDF document
\usepackage{fullpage} % formate the content to utilise the full page
%\usepackage{a4wide}
\usepackage[export]{adjustbox} % to force image position
%\usepackage[section]{placeins} % to have multiple images in a figure
\usepackage{tabularx} % for wrapping text in a table
%\usepackage{rotating}
\usepackage{multirow}
\usepackage{subcaption} % to have multiple images in a figure
%\usepackage{smartdiagram} % initialise smart diagrams
\usepackage{enumitem} % to manage the spacing between lists and enumeration
\usepackage{fancyhdr} %, graphicx} %for header to be on each page
\pagestyle{fancy} %for header to be on each page
%\fancyhf{}
\fancyhead[L]{}
\fancyhead[C]{}
\fancyhead[R]{\leftmark}
\fancyfoot[L]{Static Content} %\includegraphics[width=0.02\textwidth]{virgin_voyages.png}}
\fancyfoot[C]{} % clear center
\fancyfoot[R]{\thepage}
\setlength\voffset{-0.25in} %Space between page border and header (1in + space)
\setlength\headheight{12pt} %Height of the actual header.
\setlength\headsep{25pt} %Separation between header and text.
\renewcommand{\headrulewidth}{2pt} % adds horizontal line
\renewcommand{\footrulewidth}{1pt} % add horizontal line (footer)
%\renewcommand{\oddsidemargin}{2pt} % adjuct the margin spacing
%\renewcommand{\pagenumbering}{roman} % change the numbering style
%\renewcommand{\hoffset}{20pt}
%\usepackage{color}
\usepackage[table]{xcolor}
\hypersetup{ pdfborder = {0 0 0}} % removes the red boarder from the table of content
%\usepackage{wasysym} %add checkbox
%\newcommand\insq[1]{%
% \Square\ #1\quad%
%} % specify the command to add checkbox
%\usepackage{xcolor}
%\usepackage{colortbl}
%\definecolor{Gray}{gray}{0.9} % create new colour
%\definecolor{LightCyan}{rgb}{0.88,1,1} % create new colour
%\usepackage[first=0,last=9]{lcg}
%\newcommand{\ra}{\rand0.\arabic{rand}}
%\newcolumntype{g}{>{\columncolor{LightCyan}}c} % create new column type g
%\usesmartdiagramlibrary{additions}
%\setcounter{figure}{0}
\setcounter{secnumdepth}{0} % sections are level 1
\usepackage{csquotes} % the proper was of using double quotes
%\usepackage{draftwatermark} % Enable watermark
%\SetWatermarkText{DRAFT} % Specify watermark text
%\SetWatermarkScale{5} % Toggle watermark size
\usepackage{listings} % add code blocks
\usepackage{titlesec} % Manipulate section/subsection
\titleformat{\section}{\Huge\bfseries\color{darkblue}} % update sections to bold with the colour blue \titleformat{\subsection}{\huge\bfseries\color{darkblue}} % update subsections to bold with the colour blue
\titleformat*{\subsubsection}{\Large\bfseries\color{darkblue}} % update subsubsections to bold with the colour blue
\usepackage[toc]{appendix} % Include appendix in TOC
\usepackage{xcolor}
\usepackage{tocloft} % For manipulating Table of Content virtical spacing
%\setlength\cftparskip{-2pt}
\setlength\cftbeforesecskip{2pt} %spacing between the sections
\setlength\cftaftertoctitleskip{30pt} % space between the first section and the text ``Table of Contents''
\definecolor{navyblue}{rgb}{0.0,0.0,0.5}
\definecolor{zaffre}{rgb}{0.0, 0.08, 0.66}
\definecolor{white}{rgb}{1.0, 1.0, 1.0}
\definecolor{darkblue}{rgb}{0.0, 0.2, 0.6}
\definecolor{darkgray}{rgb}{0.66, 0.66, 0.66}
\definecolor{lightgray}{rgb}{0.83, 0.83, 0.83}
%\pagenumbering{roman}
在你的文章中,请参考以下示例中所示的方法引用 structure.tex 文件:
\documentclass[a4paper,11pt]{article}
\input{/path_to_structure.tex}}
\begin{document}
......
\end{document}
添加水印
要在 LaTeX 文档中启用水印,请使用 draftwatermark 软件包。下面的代码段和图像演示了如何在文档中添加水印。默认情况下,水印颜色为灰色,可以将其修改为所需的颜色。
\usepackage{draftwatermark}
\SetWatermarkText{\color{red}Classified} %add watermark text
\SetWatermarkScale{4} %specify the size of the text

结论
在本系列中,你了解了 LaTeX 提供的一些基本但丰富的功能,这些功能可用于自定义文档以满足你的需要或将文档呈现给的受众。LaTeX 海洋中,还有许多软件包需要大家自行去探索。
via: https://fedoramagazine.org/latex-typesetting-part-3-formatting/
作者:Earl Ramirez 选题:Chao-zhi 译者:Chao-zhi 校对:wxy
评论